
上一篇DeepSeek Harness保姆安裝教學之後,因為 DeepSeek Harness 最重要的設計原則:一切皆外掛。今天,我們就來教大家如何玩外掛!
這件事可以分成兩部分:
自己寫一個最小外掛,理解 Harness 怎樣註冊工具。
- 安裝別人寫好的外掛,直接獲得完整能力。
第一部分是學習機制,第二部分是日常使用。
保姆教學:寫一個DeepSeek Harness的最小外掛
我們做一個 greet 工具。Agent 呼叫它並傳入名字,外掛返回:
你好,Datawhale!你的第一個 Harness 外掛已經運行。
1. 準備原始碼環境
直接體驗 Harness 時,用 npx @deepseek-ai/dsh web 就夠了。開發原始 TypeScript 外掛,需要進入 Harness 原始碼倉庫,這也是官方入門文件採用的方式。
git clone https://github.com/deepseek-ai/deepseek-harness.gitcd deepseek-harness
corepack enablepnpm installpnpm run build
本文實測使用 Node.js v24.19.0。Harness 聲明的 Node.js 範圍是 ^22.19.0 || >=24.0.0,不確定時直接用 Node 24。
pnpm run build 不要省。我第一次只安裝依賴,外掛日誌雖然出現了,Web 頁面卻缺少建構產物。
2. 建立外掛檔案
仍在 deepseek-harness 倉庫根目錄執行:
mkdir -p scratch-plugin/src
新建 scratch-plugin/src/greet-tool.ts:
import type { Context } from'@deepseek-ai/cordis'import { defineTool } from'@deepseek-ai/dsh-tools'
exportconst name = 'greet-tool'exportconst inject = ['tools']
exportfunctionapply(ctx: Context) {  ctx.tools.register(defineTool({name: 'greet',description: 'Greet someone by name.',parameters: {name: {type: 'string',required: true,description: 'The name to greet',      },    },output: {schema: { type: 'string' },render: (_args, value) => [{ type: 'text', text: value }],    },asyncexecute(args) {return`你好,${args.name}!你的第一個 Harness 外掛已經運行。`    },  }))console.log('[greet-tool] loaded; tool name: greet')}
先不用研究所有類型。這個外掛只有四個部分:
- name:外掛名稱。
- inject:聲明需要 Harness 的工具服務。
- apply(ctx):外掛載入入口。
- ctx.tools.register(...):註冊一個模型可以呼叫的工具。
parameters 告訴模型該傳什麼;execute 真正執行程式碼;output 約定結果的類型和顯示方式。
3. 把外掛插入 Harness
先執行 pwd,拿到當前 Harness 倉庫的絕對路徑。
新建 scratch-plugin/cordis.yml:
- insert:- id: greet-tool name: '/Users/yourname/deepseek-harness/scratch-plugin/src/greet-tool.ts'
把 name 換成你機器上的絕對路徑。
外掛最好放在 Harness 原始碼倉庫內。這個示例依賴倉庫裡的 @deepseek-ai/cordis 和 @deepseek-ai/dsh-tools;放到另一個目錄,可能出現 Cannot find module。
4. 啟動並檢查
pnpm dsh web --patch ./scratch-plugin/cordis.yml
如果 3080 連接埠已經被佔用:
pnpm dsh web --patch ./scratch-plugin/cordis.yml--port3082
看到下面兩行,說明外掛和 Web 服務都已就緒:
[greet-tool] loaded; tool name: greetdsh web: http://127.0.0.1:3082
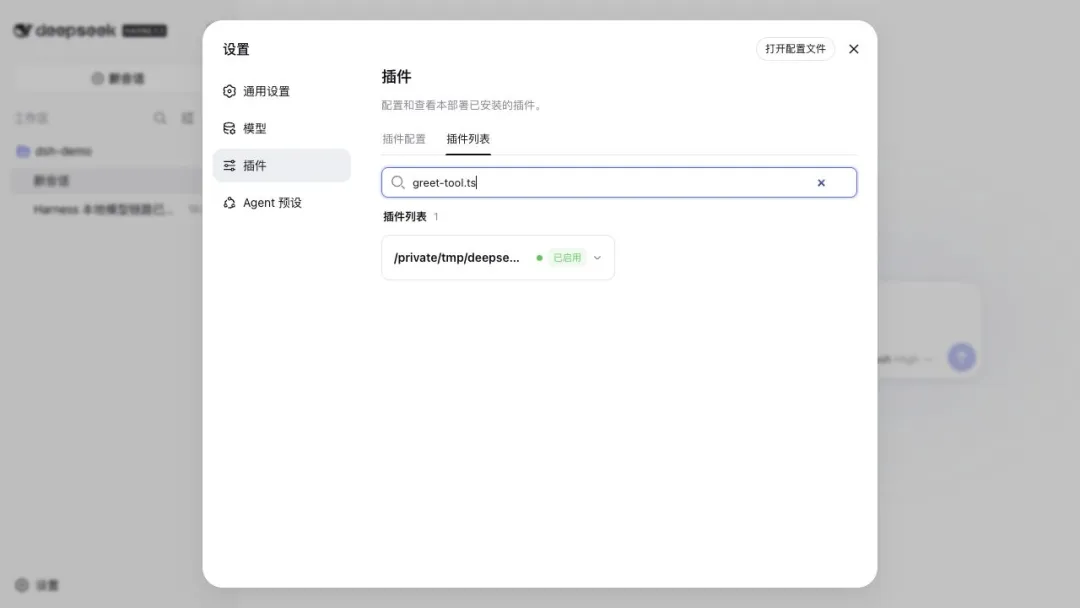
進入“設定 → 外掛 → 外掛列表”,搜尋 greet-tool.ts,狀態應為“已啟用”。
5. 讓 Agent 呼叫它
選擇工作區,新建一個標準模式會話,輸入:
請呼叫 greet 工具問候 Datawhale。、
展開工具呼叫,可以看到輸入和輸出:
IN { "name": "Datawhale" }OUT 你好,Datawhale!你的第一個 Harness 外掛已經運行。
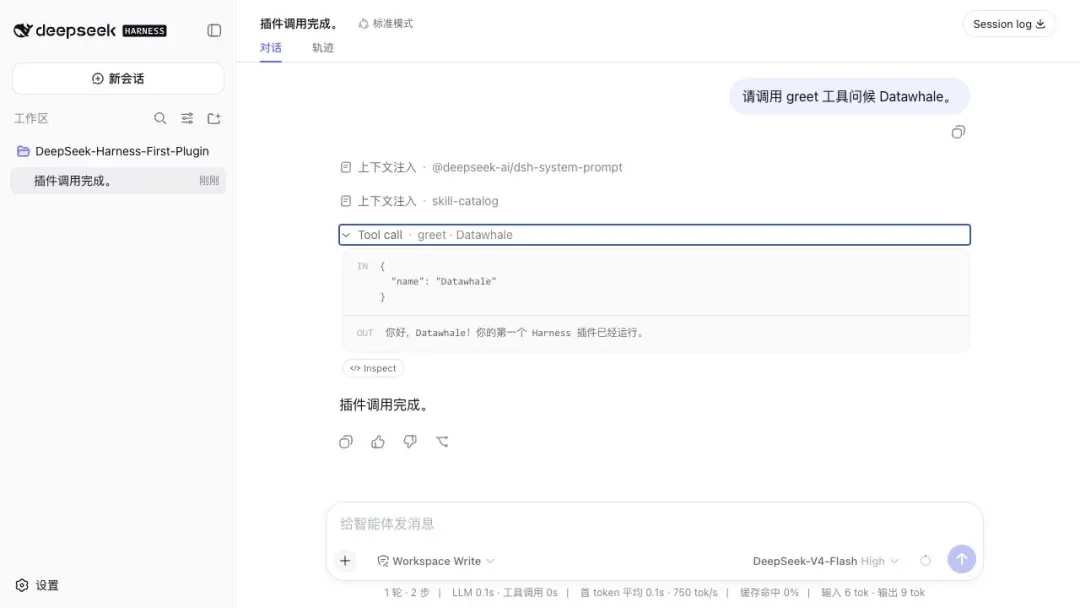
至此,外掛最小閉環已經跑通:載入外掛、註冊工具、模型呼叫、返回結果。
直接安裝生產級的外掛
greet 適合學習,但解決不了真實問題,開發一個完整外掛的難度也是比較高的。所以,我們可以直接用大佬們做的外掛。
以 DSH Vision Toolkit 為例。DeepSeek 當前這條 Chat Completions 路由是純文字模型,不能直接理解圖片;Vision Toolkit 可以把圖片交給單獨的視覺模型,再把文字、坐標和檔案產物送回 Harness。
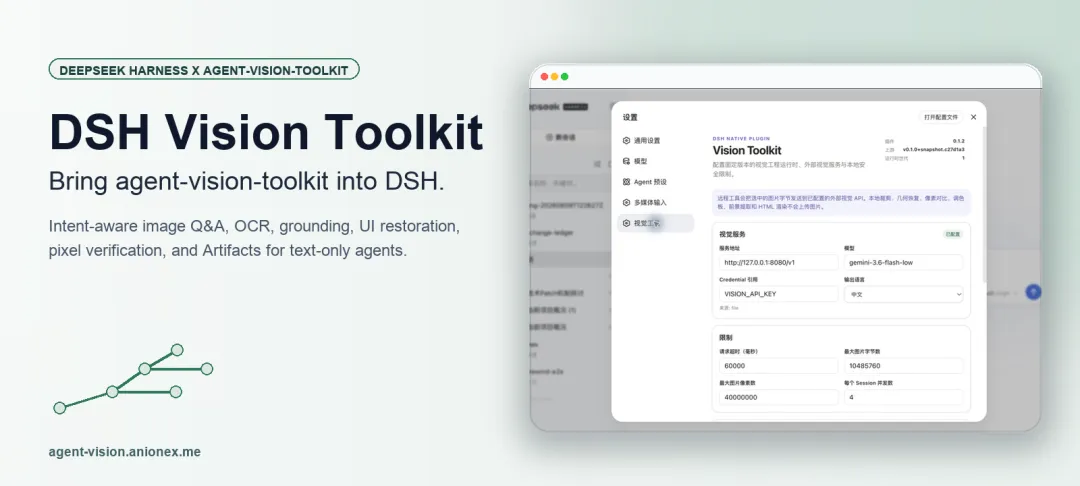
它提供圖片問答、OCR、元素定位、圖片裁剪、像素對比和 HTML 截圖等工具。
1. 安裝外掛
如果你的終端裡已經有 dsh 命令:
dsh plugin --profile web add @dsh-external/dsh-vision-toolkit
如果上一篇一直使用 npx,可以寫成:
npx @deepseek-ai/dsh@0.1.0-rc.6\ plugin --profile web add @dsh-external/dsh-vision-toolkit
外掛安裝到 web Profile 後,檢查配置裡是否已經出現它:
dsh --profile web --dump-config | grep vision-toolkit
然後重啟正在運行的 Harness Web 服務。外掛的宿主程式碼和瀏覽器程式碼都在啟動時載入,只刷新頁面通常不夠。
2. 配置視覺模型
Vision Toolkit 要求 Python 3.11 或更高版本。第一次使用 managed 執行階段還需要聯網安裝它鎖定的 Python 依賴。
打開 Harness 的“設定 → 視覺工具”,配置:
- 一個相容 OpenAI 介面的視覺模型地址;
- 對應的視覺模型名稱;
- 一個 DSH Credential 引用,例如
VISION_API_KEY。
金鑰可以通過命令寫入 Harness 的憑據系統:
dsh credentials set VISION_API_KEY
這裡配置的應該是視覺服務 Key,不是默認的 DeepSeek 文字模型 Key,除非你使用的閘道器明確同時提供視覺模型。
在設定頁面點選“測試連接”。遠端圖片問答、定位和 OCR 需要視覺服務;裁剪、顏色分析、像素對比等本地工具不需要 Key。
3. 在會話中使用
把圖片複製進當前工作區,例如:
./screenshot.png
在會話中先載入外掛附帶的 Skill:
/vision-tools
然後直接描述任務:
請用 vision_glance 分析 ./screenshot.png,告訴我頁面上出現了什麼錯誤。
也可以做更具體的工作:
請用 vision_ground 定位截圖裡的傳送按鈕,並生成帶標註的預覽圖。請比較 reference.png 和 actual.png,告訴我差異最大的區域。
外掛會按需向當前 Agent 暴露對應的 vision_* 工具。生成的裁剪圖、熱力圖和報告會保存在工作區的 .dsh-vision-toolkit/artifacts 目錄中。
4. 更新或解除安裝
dsh plugin --profile web updatedsh plugin --profile web remove @dsh-external/dsh-vision-toolkit
操作後重新啟動 Web Profile。
安裝第三方外掛前的注意事項
- 倉庫是否公開,許可證和維護者是否清楚;
- 安裝指令碼會下載什麼,是否會運行額外程序;
- 外掛需要那些目錄、網路和憑據權限;
- 是否說明支援的 Harness 版本、解除安裝方式和測試方法。
Harness 外掛運行在宿主處理程序裡,屬於可信程式碼。不要因為安裝命令只有一行,就跳過原始碼和權限檢查。
寫在最後
自己寫外掛時,最小結構是:
apply(ctx) → 註冊工具 → execute(args) → 返回結構化結果
使用現成外掛時,流程是:
plugin add → 重啟 Profile → 配置憑據 → 載入 Skill → 呼叫工具
前者讓你理解 Harness,後者讓 Harness 真正變得有用。 (Datawhale)